Ubuntu, Apache, PHP and MySql configuration with AWS
Login into AWS: https://console.aws.amazon.com/


8. Configure Security Group


• sudo apt update
• sudo apt install apache2
Adjust the Firewall to Allow Web Traffic
• sudo ufw app list
• sudo ufw app info "Apache Full"
• sudo ufw allow in "Apache Full"
• sudo mysql_secure_installation (If you want to secure installation)
• apt show php-cli
• sudo apt install php-cli
• http://your_server_ip/info.php
• sudo rm /var/www/html/info.php
• sudo apt install phpmyadmin php-mbstring php-gettext
• sudo phpenmod mbstring
• sudo systemctl restart apache2
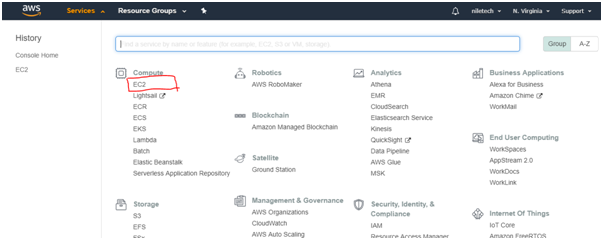
1. Choose EC2
2. Launch Instance
3. Choose Machine type (Ubuntu)
4. Select Free Tier and Next: Configure Instance Details
5. Next: Add Storage
6. Change Size(GB) 8 to 30(Max) and Next: Add tags
7. Add tags (Optional) and Next: Configure Security Group
8. Configure Security Group
Add Rules (SSH, All TCP, All UDP, RDP, All Traffic, HTTP, HTTPS)
Change Source custom to Anywhere
9. Review Instance and Launch
10. Create Key Pair and Launch Instance
11. Instance Status
12. Instance IP
Connectivity with Ubuntu
1. Download and Install Putty Key generator
2. Load .pem file
3. Save private key
4. Download and install PuTTy
5. Enter server details
6. Choose saved private key file
Installation Apache, MySQL & PHP
Step 1 — Installing Apache and Updating the Firewall
Install Apache using Ubuntu's package manager• sudo apt update
• sudo apt install apache2
Adjust the Firewall to Allow Web Traffic
• sudo ufw app list
• sudo ufw app info "Apache Full"
• sudo ufw allow in "Apache Full"
Step 2 — Installing MySQL
• sudo apt install mysql-server• sudo mysql_secure_installation (If you want to secure installation)
Step 3 — Installing PHP
• sudo apt install php libapache2-mod-php php-mysql• apt show php-cli
• sudo apt install php-cli
Step 4 — Testing PHP Processing on your Web Server
• sudo nano /var/www/html/info.php• http://your_server_ip/info.php
• sudo rm /var/www/html/info.php
Step 5 — installing phpMyAdmin
• sudo apt update• sudo apt install phpmyadmin php-mbstring php-gettext
• sudo phpenmod mbstring
• sudo systemctl restart apache2
Good stuff man !
ReplyDeleteReally appreciate it.
Thanks!